The ESP8266 eight-way relay development board is equipped with ESP-12F WiFi module and supports DC7-28V/5V power supply. Provide For Arduino development environment reference code, suitable for ESP8266 secondary development learning, smart home wireless control and other occasions.
1. On-board mature and stable ESP-12F WiFi module, large capacity 4M Byte Flash;
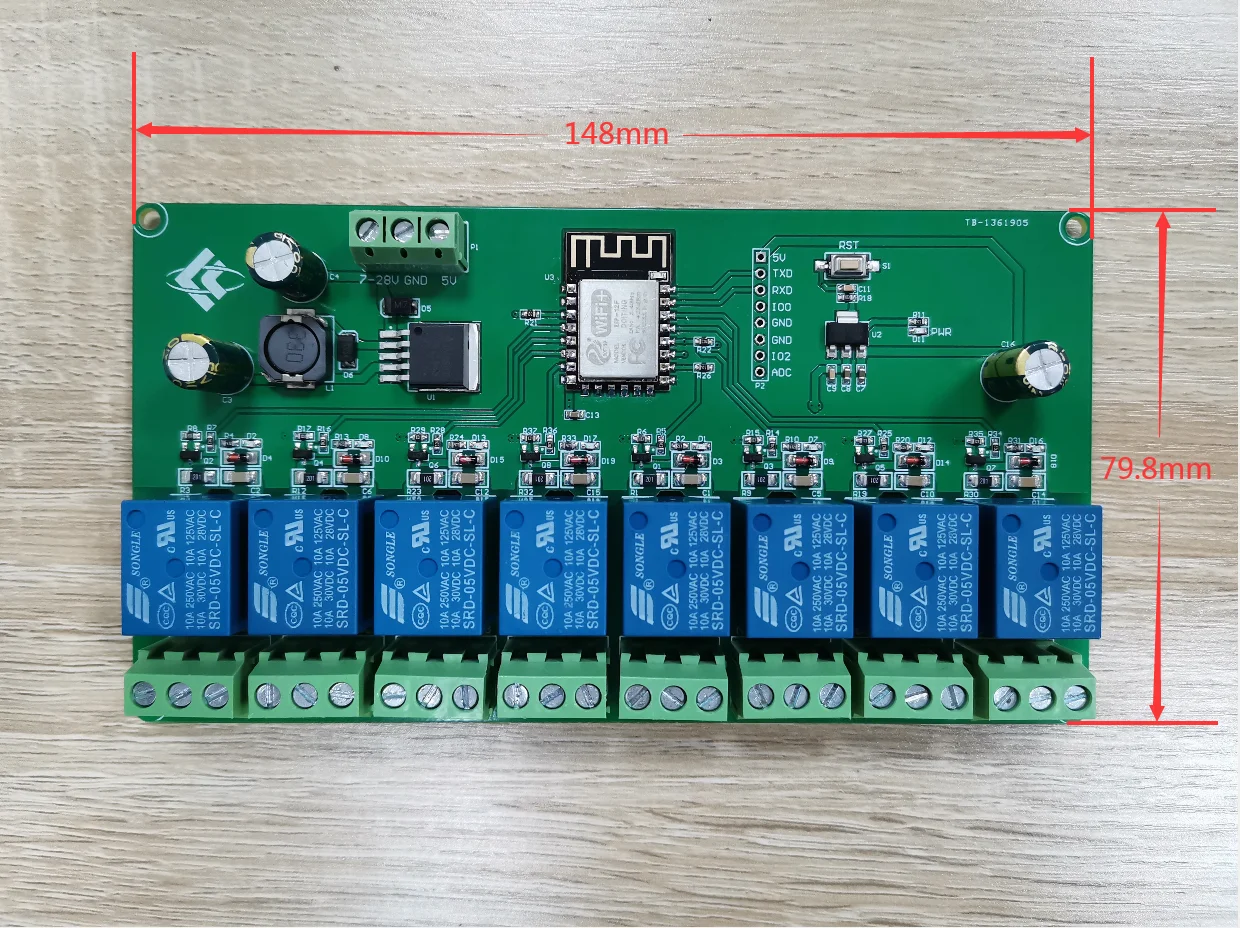
2. The power supply mode supports DC7-28V/5V
3. Onboard WiFi module RST reset button
4. ESP-12F supports the use of Eclipse/Arduino IDE and other development tools, and provides reference programs under the Arduino development environment;
5. There are 8 5V relays on board, outputting switch signals, suitable for controlling loads whose working voltage is within AC 250V/DC30V;
6. Onboard power indicator and relay indicator.
7. Board size: 148*79.8mm
8. Weight: 140g
Interface introduction

Programming port: ESP8266's GND, RX, TX, 5V are respectively connected to the GND, TX, RX, 5V of the external TTL serial port module. IO0 needs to be connected to GND when downloading, and then disconnect the connection between IO0 and GND after the download is complete;
Relay output:
NC: Normally closed, the relay is short-connected with COM before it is closed, and it is suspended after it is closed;
COM: public end;
NO: Normally open end, the relay is suspended before being closed, and shorted to COM after being closed.
GPIO lead port introduction
序号
| 名称
| 功能说明
|
1
| ADC
| A/D转换结果。输入电压范围0~1V,取值范围:0~1024
|
2
| IO2
| GPIO2; UART1_TXD
|
| TXD
| UART0_TXD; GPIO1
|
3
| RXD
| UART0_RXD; GPIO3
|
4
| GND
| 电源地
|
5
| 5V
| 5V电源
|
For Arduino development environment setup
ESP8266 supports development tools such as Eclipse/Arduino IDE. It is relatively simple to use Arduino. Here is how to build Arduino development environment:
1. Install Arduino IDE 1.8.9 or the latest version;
2. Open the Arduino IDE, click File-Preferences in the menu bar, and click Add URL in "Additional Development Board Manager URL" after entering the preferences: http://arduino.esp8266.com/stable/package_esp8266com_index.json,

- Click Tools-Development Board-Development Board Manager in the menu bar, and then search for "ESP8266" to install For Arduino support package 2.5.2 or the latest version of ESP8266

Note: Since the download URL is from a foreign country, the access speed is relatively slow, and download errors may occur. Just try a few more times when the network is good.
Program download
1, Use a jumper cap to connect the IO0 and GND pins, prepare a TTL serial port module (for example: FT232) to plug into the computer USB, the serial port module and the development board are connected as follows:
TTL串口模块
| ESP8266开发板
|
GND
| GND
|
TX
| RX
|
RX
| TX
|
5V
| 5V
|
2. Click Tools-Development Board in the menu bar, select the development board as ESPino (ESP-12 module)
3. Open the program you want to download, click on Tools-Port in the menu bar to select the correct port number
4. After clicking "Upload", the program will be automatically compiled and downloaded to the development board, as follows:

5. Finally, disconnect IO0 and GND, power on the development board again or press the reset button to run the program.
.png?1671784274334)
